Facebook Live has emerged as a powerful tool that changes the ways brands and content creators like yourself connect with your audience. Before we uncover how to go live on Facebook, let us first talk about what it is and what you can gain from using Facebook Live.
How does Facebook Live work?
Facebook Live is a dynamic feature that allows users to broadcast live videos in real-time to their audience. Through Facebook Live, brands and content creators can enable viewers to actively react, share, and engage through comments during the livestream. After the stream ends, the recorded video can remain accessible on your page or profile, ensuring lasting engagement and wider viewership. Facebook Live videos are public, allowing viewers to watch on any device with access to Facebook without requiring users to sign in or create an account.
Now that you know how Facebook Live works, let’s dive right in on how to go live on Facebook step-by-step! We’ll cover how to go live on Facebook from mobile device, desktop and creator studio.
Facebook Live From Mobile Device/Facebook App
First, we’ll feature basic steps on how to go Facebook live on an iPhone or an Android.
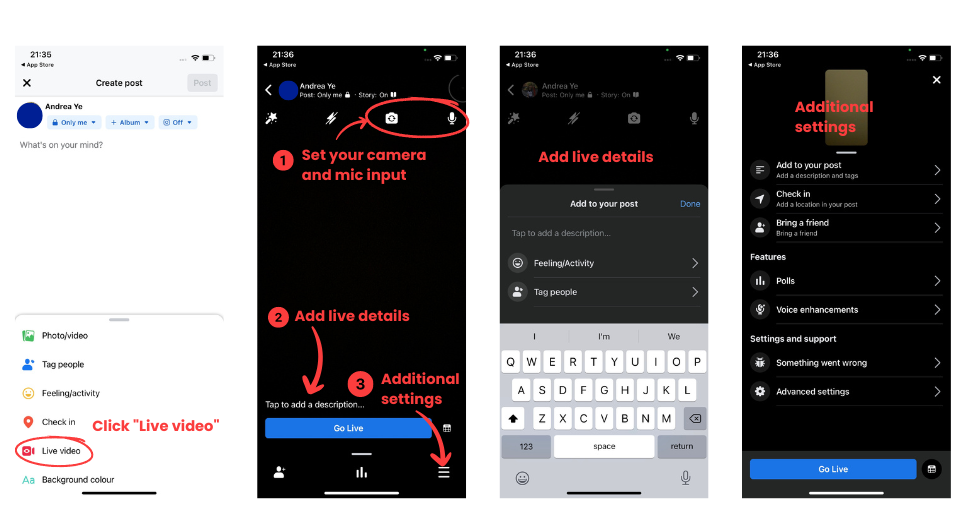
Step 1: Open the Facebook app and navigate to your Page, Group, or event that you want to use to go live.
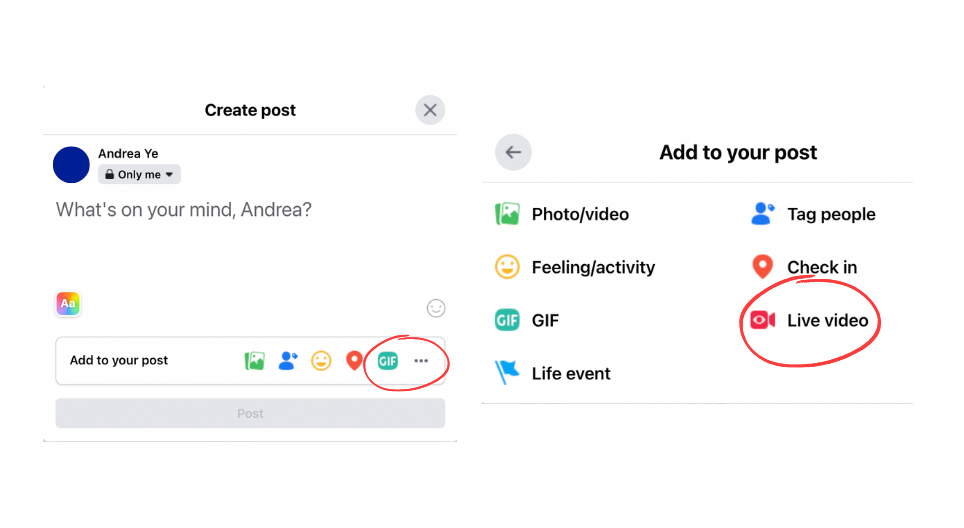
Step 2: Tap “What’s on your mind?” to create a new post. This will open the post options.
Step 3: From the available options, select “Live Video”
Step 4: Customize your live video settings, such as privacy settings, audience targeting, and video title.
Step 5: Craft a compelling description that sets the context and entices viewers to join your live stream. Here you can add tags to other relevant Facebook profiles or pages, add a location or insert a feeling or activity.
Step 6: Once ready, tap “Go Live” to initiate the live broadcast. When you’re done with your live stream, tap “Finish”. After you’ve finished your live stream, you can choose whether to post your stream on your profile or page as a video or delete it.
Facebook Live From Your Desktop/Web Browser
Facebook has a built-in tool called Live Producer that fires up automatically, and with it, you can stream directly from a web browser on your Desktop PC or notepad. It can use your built-in camera and microphone, or you can use an external camera and mic. There is also an option to use streaming software or an encoder. Here is how how to do Facebook live from your desktop or web browser:
Step 1: Depending on where you want to live stream from, go to your Facebook Page/Group or your profile.
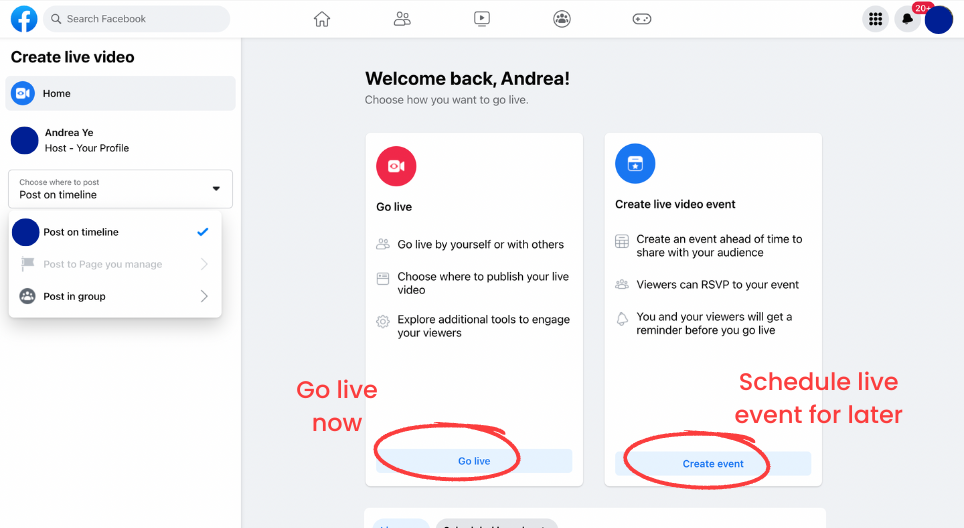
Step 2: Click on “Create Post” at the top of the Page/Group or locate your “What’s on your mind” space. Click “More” and choose Live video from the list of options.
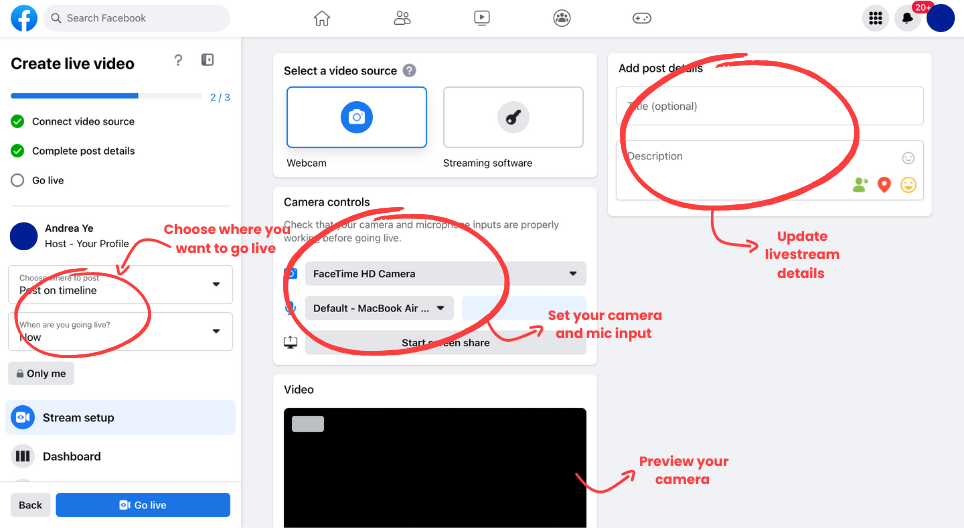
Step 3: On the left side of your screen, choose whether you want to post on your timeline or in a group. Then click “Go Live”. Don’t worry; you won’t be live streaming immediately after that. Here you can adjust your camera and microphone settings or add streaming software. If you choose streaming software, Facebook will generate a Stream key that you will need to add to your software, for example, OBS Studio. Check if your microphone and camera are working properly.
Step 4: On the right side of the screen, you can:
- Add your post details, title, and description to capture your audience’s attention.
- Set your privacy preferences and audience targeting options.
- Set up your cross posting options if you want to share your stream on other pages.
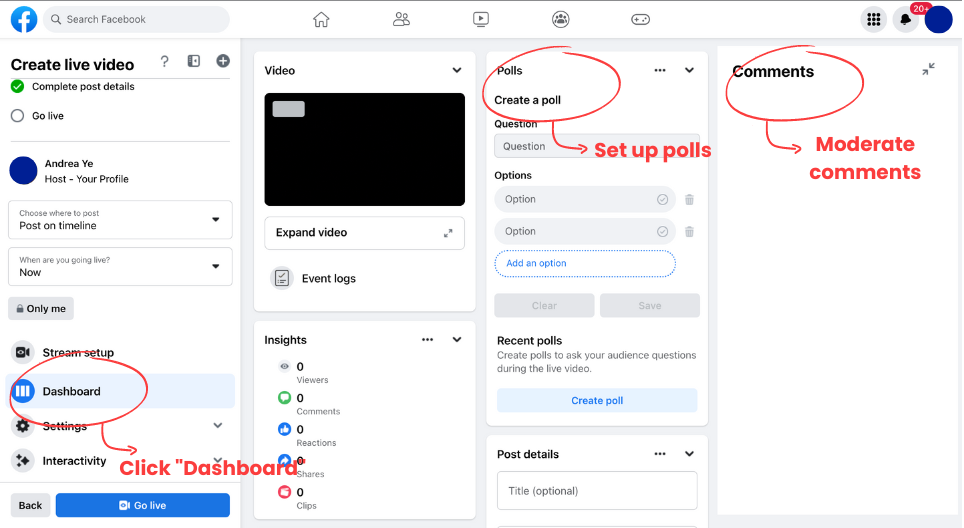
Step 5: On the left side, if you choose your Dashboard tab, you can set your community moderators to screen the comments on your live video and look for potentially disturbing content. Here you can set up the polls you will use during your live stream.
Step 6: The tab below Dashboard on the left side – Settings allows you to choose other options like the stream latency. This is the time delay between your camera capturing a moment and that moment being shown to your viewers. If you don’t know what you are doing, leaving this on Auto is best.
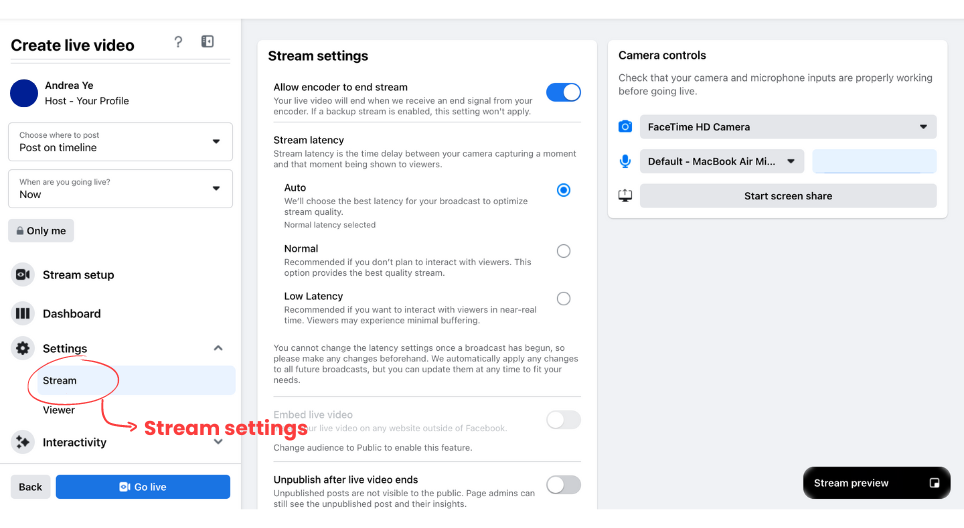
Step 7: Next is the Interactivity tab, where you can turn on your chatbot and create polls, questions, graphics, or prompts (links) that you will show during your stream. Note that graphs can be shown only when you use streaming software or a paired encoder.
Step 8: Now, click “Go Live” to start broadcasting and engaging with your audience in real time. When you finish your stream, click “Finish” and choose whether to post your video or delete it.
How to Use Facebook Live From Creator Studio
Step 1: Navigate to Creator Studio or Meta Business Suite from your Facebook Page.
Step 2: Click on the “More” button in the top right side and then choose “Go Live”.
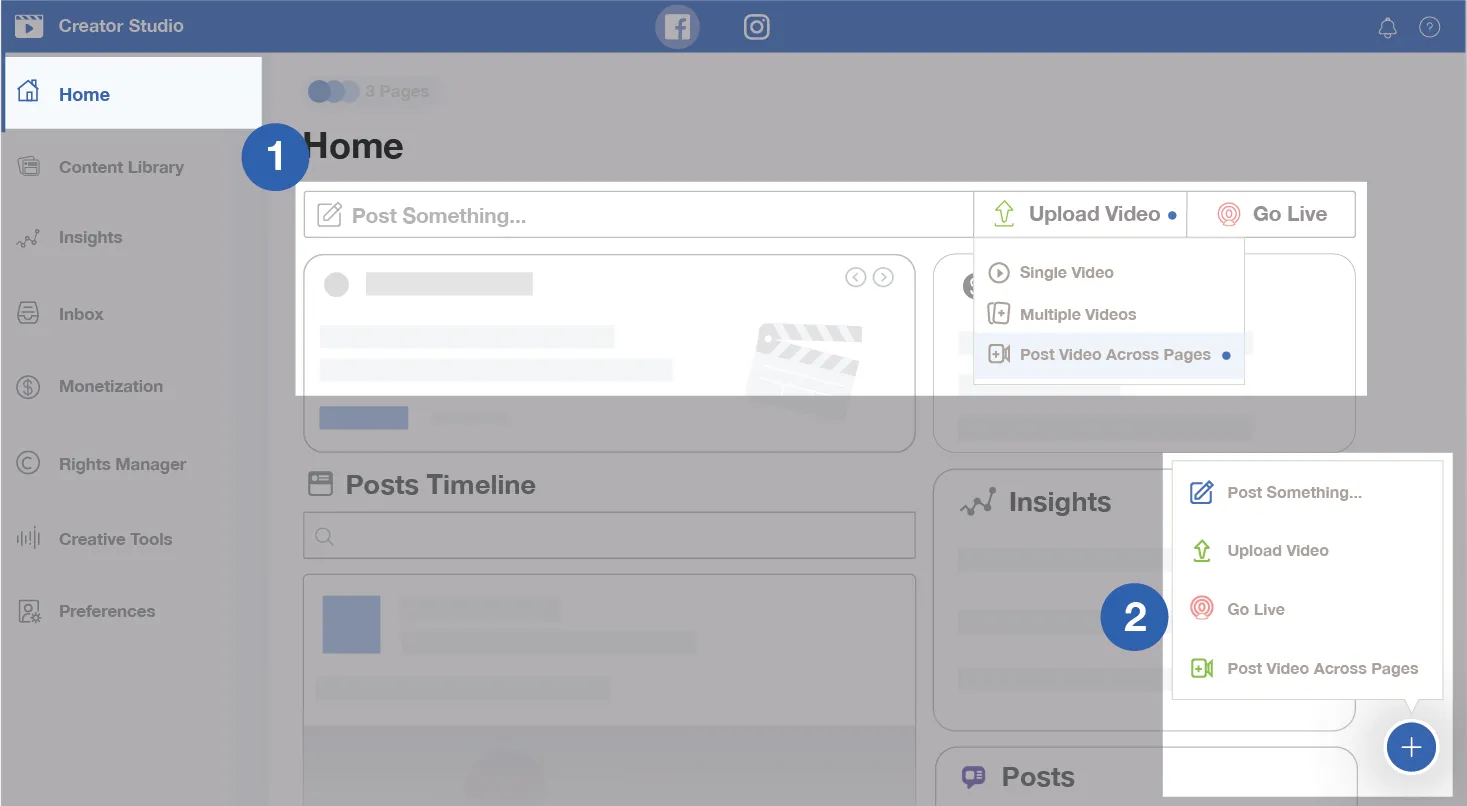
Step 3: Then click “Go Live” again to prompt the Live Producer. Don’t worry; you won’t be live streaming just yet. From now on, the procedure is the same as with streaming through your Profile, Page, or Group.
Step 4: Adjust your camera and microphone settings or add streaming software. If you choose streaming software, you need to copy the Stream key that Facebook will generate and add it to your streaming software, for example, OBS Studio. Double-check your microphone and camera.
Step 5: Add your stream details, title, and description.
Step 6: Set your privacy preferences and audience targeting options. If you want to share your stream on other pages, set up your cross posting options.
Step 7: You can set your community moderators on the left side of your Dashboard tab. This is an optional step.
Step 8: The tab Settings allows you to choose other options like the stream latency. This is the time delay between your camera capturing a moment and that moment being shown to your viewers. If you don’t know what you are doing, leaving this on Auto is best.
Step 9: Next is the Interactivity tab, where you can turn on your chatbot and create polls, questions, graphics, or prompts (links) that you will show during your stream. Note that graphs can be shown only when you use streaming software or a paired encoder.
Step 10: Now, you can click “Go Live” to start broadcasting and engaging with your audience in real time.
Step 11: When you end the stream by clicking “Finish”, choose whether you want to save and post your video or delete it.
How to Go Facebook Live Through a Facebook Group
Step 1: Access your Facebook Group and click on “Write Something.”
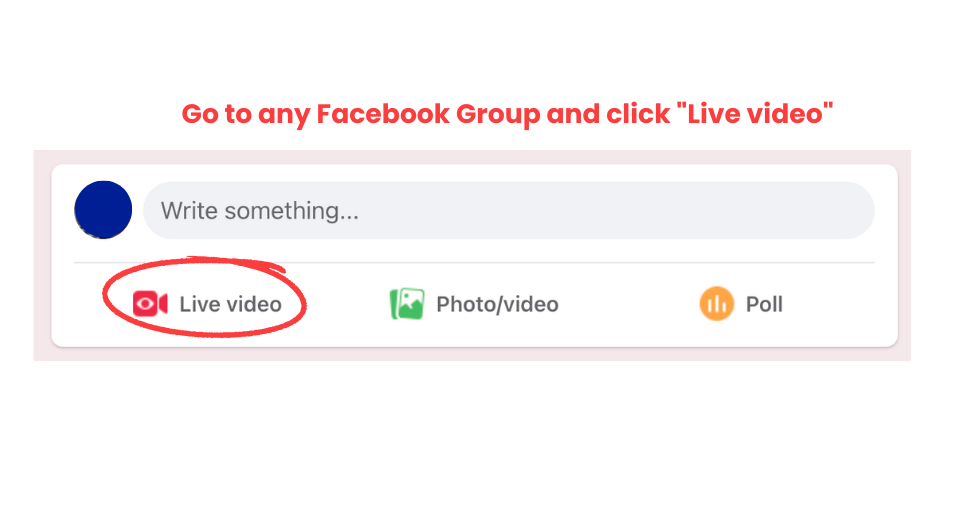
Step 2: Choose “Live Video”.
Step 3: Set your privacy preferences for the live stream.
Step 4: Craft a compelling title and description.
Step 5: Click “Go Live” to start your live stream.
Tips for Using Facebook Live
- Ensure your connection is strong. The stream quality will depend on how fast and stable your internet connection is.
- The more you engage with your audience, the more you will reap the benefits of social interactions – this is especially important for building connections. Simply greeting or thanking them can go a long way. If you want to up your game, why not answer questions during your live stream?
- Live stream for longer periods because this may boost the possibility of being discovered by more people.
- Notify your audience when you plan on going live on Facebook and create a sense of anticipation and excitement.
- Don’t shy away from going live more often, this will keep your engagement up.
FAQs
Q: Why can’t I go live on Facebook?
A: If you’re experiencing difficulties going live, ensure your account meets Facebook’s live streaming requirements and adheres to community standards. Check for any restrictions or violations that might prevent you from broadcasting live.
Q: How long can I stream live on Facebook?
A: Live streams on mobile devices are limited to four hours, while desktop streams can extend up to eight hours.
Analyzing Video Performance and Elevating Engagement
You did it! Now, it is time to analyze your video’s metrics to gain valuable insights into its performance. Pay attention to key metrics like reach, engagement, retention, and peak viewers to understand your audience’s preferences and behavior and elevate your future approach.
Engagement doesn’t end when the live stream does. Foster continued interaction by responding to comments, answering questions, and acknowledging feedback post-broadcast. Keeping the conversation alive builds trust and loyalty among your audience.
Additionally, you can build anticipation for upcoming live streams by promoting them on your social media channels and website. After each broadcast, share highlights, takeaways, or teasers for future live events. The strategic promotion encourages viewership and engagement.
What Next? How to Utilize Your Video Content?
After you have had an exhilarating and interactive livestream experience with your audience, it is time to leverage your amazing content further! No matter if it was a thrilling Q&A, an engaging live chat, or an exciting challenge, now you’re left with a sense of accomplishment and a fortune’s worth of valuable insight. And this is exactly the key to extending the life of your live stream. You want to repurpose its content creatively.
You can easily do this by identifying the moments that elicited the most reactions and engagement from your viewers. Moreover, you can handpick the finest clips to be transformed into captivating Facebook videos for your audience. This way, you can reuse them on multiple social media channels.
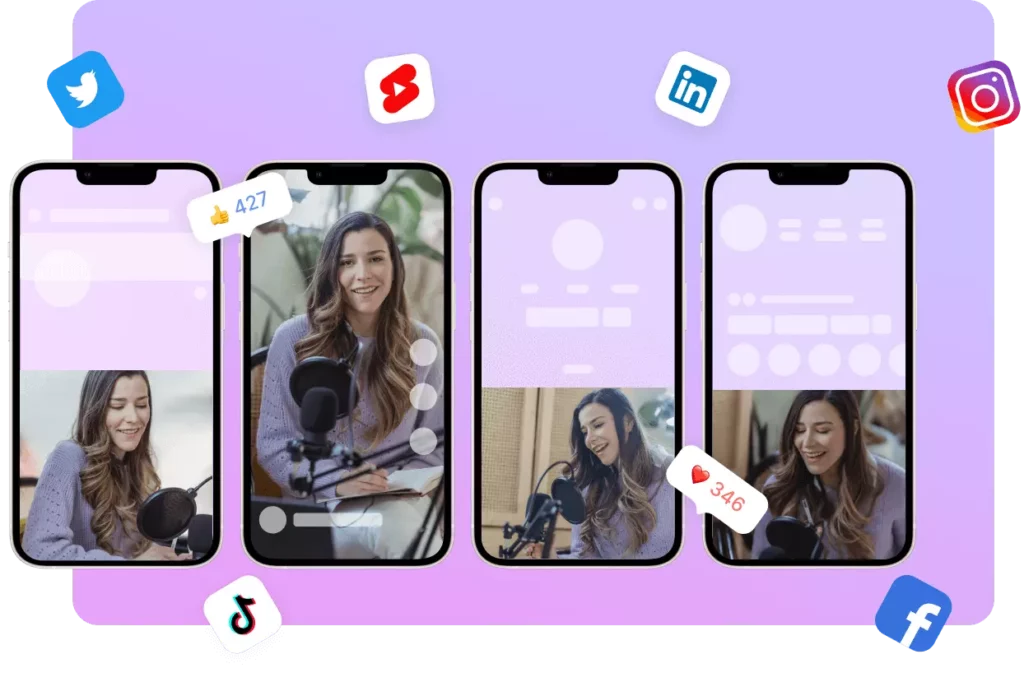
Vizard is a remarkable video repurposing tool that makes this process a breeze. Simple to use, you just need to record your live stream and upload it to Vizard. Within moments, you’ll have ready-to-publish short clips that capture the essence of your live stream. Each one will be ready to wow your audience once again!
Conclusion
Knowing how to go live on Facebook offers an unparalleled opportunity for social media managers. It is really hacking the ways to establish authentic connections, increase engagement, and elevate your brand’s online presence.
So, by embracing the power of live streaming and utilizing its plethora of features, you can create captivating content that resonates with your audience. Vizard only assists you in setting your social media strategy on a path to success. If you’re seeking expert guidance to make the most of Facebook Live, don’t hesitate to reach out to Vizard’s team of professionals.