As of 2023, social media giant Instagram has a user base of over 1.3 billion worldwide, with approximately 127 million being U.S.-based. The bottom line, therefore, is that if you want to get your brand noticed, Instagram is a great place to do so, and the platform’s “Reels” feature makes for one of the best tools in your awareness-generating toolbox.
From middle schoolers to small business owners, it seems as though everyone knows how to create a reel on Instagram these days, but the fact is that you aren’t trying to make some laughs in the cafeteria or reach a dozen or so prospects in a small town. You want to gain traction among a large audience, generate quality leads, and make a meaningful impact on your business revenue by producing quality content.
With that in mind, let’s look at how to make a reel on Instagram so you can add another component to your marketing mix.

What Are Instagram Reels?
Before we shift our attention to how to make a reel, let’s first recap what reels are as a form of content.
Instagram Reels are videos shot in portrait view (that is, vertically) that take up the viewer’s entire screen. If you record your video directly via the Instagram app, your video can be up to 90 seconds long, but if you pre-shoot and edit your video to upload onto the platform, you can create content up to 15 minutes in length.
Reels are a permanent fixture on the platform unless manually deleted, distinguishing them from their time-limited counterparts, known as Stories, which disappear after 24 hours. In addition, Meta has created a dedicated section on the Instagram app for Reels, located front and center on the Explore tab, where users can scroll through a feed full of trending content (much like its competitor video-sharing app, TikTok).
Additionally, the Instagram Reels platform includes an extensive library of audio tracks, which feature trending music and snippets from viral content, alongside a broad range of editing tools that you can use to add effects, slow down or speed up your content, splice together clips, and do much more.
Why Should You Make Instagram Reels?
We know you are eager to learn how to make a reel on Instagram, but stakeholders and team members may require a little convincing, especially if they already have a broad and complex mix of marketing tactics. To address their concerns, allow us to bring them up to speed on the many benefits associated with Instagram Reels.
In particular, by adding Reels to your game plan, your business can achieve the following:
Appeal to Instagram’s Algorithm
Despite initially launching three years ago, Instagram Reels is still a fan-favorite feature among users and content creators alike, and the platform’s algorithm also seems to favor Reels. It’s unclear whether the popularity of Reels exploded because the algorithm selects it or vice versa, but either way, tailoring your marketing strategy to align with the app’s algorithm by making Instagram Reels is a smart move.
Adding Instagram Reels to your page can also increase your overall visibility and reach. You’ll be able to connect with more prospective clients, generate intrigue about your products or services, and entertain existing customers, all of which can create feelings of loyalty and trust toward your brand, increase the average customer lifetime value, and help you push toward growth goals.
Increase User Engagement
Keeping users engaged with your brand is, of course, critical to nurturing leads and maintaining the loyalty of existing customers. The rise of TikTok and Instagram Reels have both demonstrated that users love short-form video content, so providing them with as much as possible is a relative no-brainer.
However, bombarding your target audience with low-quality videos won’t suffice. You’ll need to consistently produce high-quality, captivating content that aligns with the preferences of your core audience.
Leverage the Explore Tab
Although not the sole form of content on the Explore page, Reels seem to steal the show. Simply click on the Explore tab of your personal Instagram page, and while you may stumble upon the occasional Story or post, Reels will undoubtedly dominate your feed.
With that in mind, adding Instagram Reels to your marketing mix increases your visibility on users’ Explore pages, a tactic you can use to connect with new prospects or reintroduce yourself to your existing followers.
Diversify Your Content
In the marketing industry, staying on top of the latest trends and understanding user preferences is crucial to success. To create a comprehensive marketing strategy, it’s essential to incorporate diverse platforms that resonate with your audience. Instagram Reels is an excellent addition to your marketing toolkit that can provide unique and personalized ways to connect with your followers. By leveraging Reels, you can increase your brand’s resilience and stay ahead of the competition.
How to Make a Reel on Instagram
Instagram Reels have been one of the most popular features on the platform for a few years now, and they don’t look to be fading into obscurity anytime soon. Thankfully, learning how to make Instagram Reels is easier than you might expect.
Here are six simple steps to help you produce your first Instagram Reel:
1. Come Up with a Great Idea
Before hitting “Record” on your Instagram app, we suggest bringing your team together to pool your creativity. While it might be tempting to launch the app and hope for a marketing epiphany, a collaborative approach can lead to more impactful content and better engagement with your audience.
To start planning Instagram Reel content, treat it much like any other marketing project. However, remember that the concepts and ideas you emphasize should translate effectively to short and snappy video content that fits within the in-app 90-second time limit, at least in the beginning. As you gain traction on the platform, you can gradually start to produce longer content.
Also, keep in mind that you need to have an immediate hook. From the opening frame to the background music you pair with it, every element must grab the user’s attention and keep them focused on your message. During your planning session, ensure you understand how to address your core message and how you plan to open and close your Reel.
2. Tap the Plus Icon and Select “Reel”
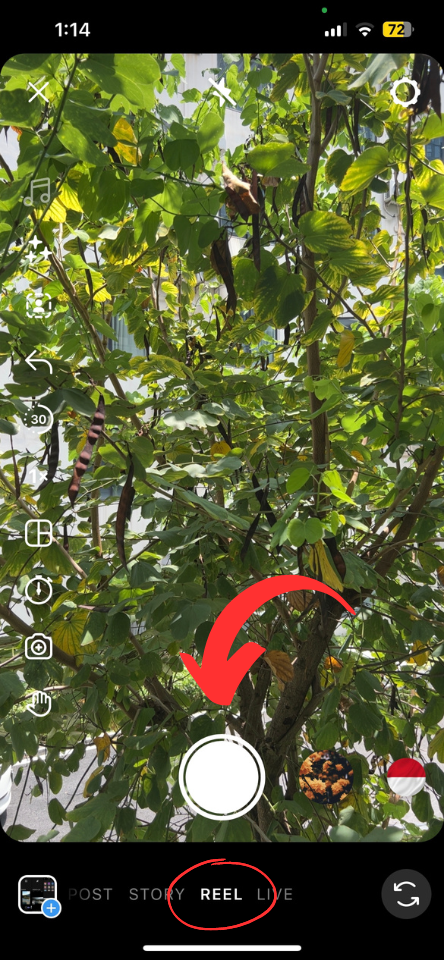
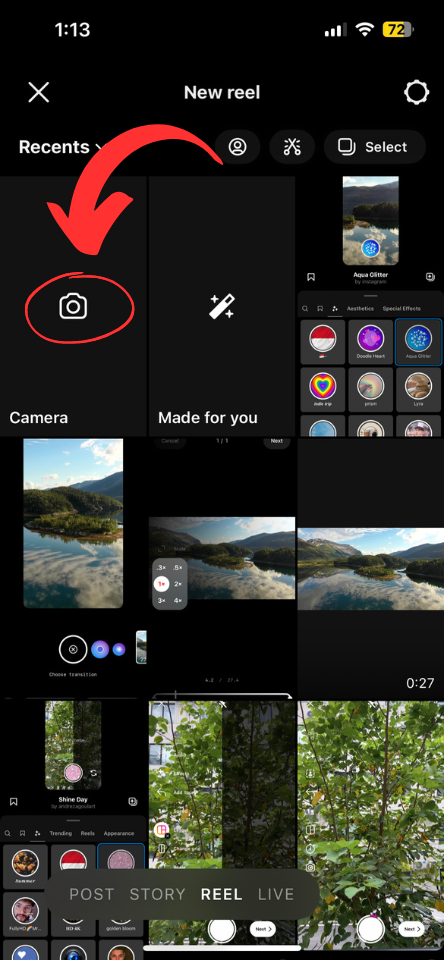
After you have developed a winning concept, you are ready to start recording. Launch the Instagram app and go to your business or profile page. Next, click on the plus sign button in your screen’s top right corner, then select “Reel.” Alternatively, you can simply swipe left on your page to access your Instagram camera, then select “Reel” from the menu at the bottom of the screen.
3. Record a Clip, or Upload an Existing One
The Instagram Reel menu offers two choices: capture live footage by pressing and holding the record button or upload a pre-existing video from your device’s camera roll. If you choose to shoot a new video, there is no need to get everything in one take! Instagram allows you to film a series of short, separately-recorded clips. This way, you can capture the perfect moment every time.
Set a timer if you want to go hands-free during the recording process. You’ll activate the recording feature by tapping, not holding, the record button, and whenever you are ready to end the recording, just tap the button again.
Once you are done recording, the “Align” button will appear, allowing you to line up frames from previous clips before you start on the next one and thus create smooth transitions between clips.
If you want to delete or alter the clip you just recorded, tap the “Edit Clips” button and make the necessary adjustments. Make sure you actually want to get rid of that segment, though, as once you hit the red “Delete” button, it will be gone forever.
4. Flex Your Creativity During the Editing Process
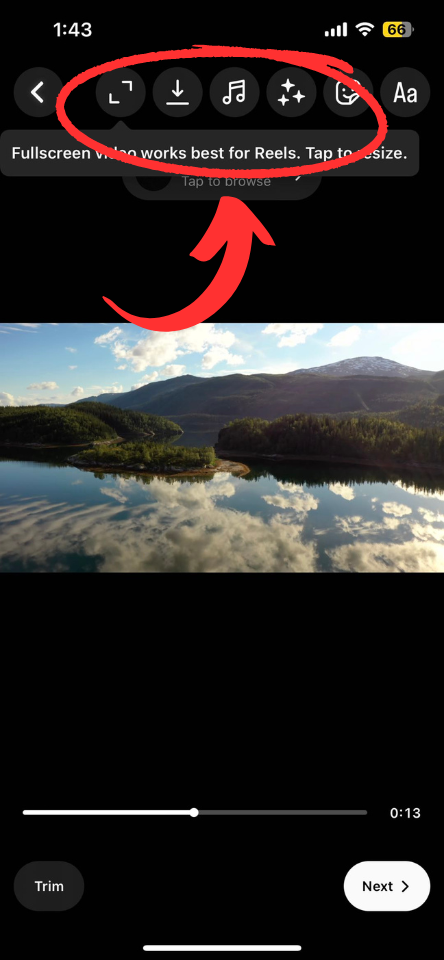
Once you have recorded and aligned each clip of your Reel, put the editor to work. It’s packed with tools to make all your edits in the Instagram app. With the Reels editor, enhancing your videos has never been more effortless.
Here is a quick rundown of each editing feature:
- Audio: Import audio from your device or the Instagram music library and pair it with your video.
- Length: Alter the length of the video. You can make your content 15, 30, 60, or 90 seconds long.
- Speed: Slow your video down to .3x or .5x, or speed it up by a factor of 2, 3, or 4.
- Layout: Add multiple recordings to one frame or alter your layout.
- Timer: Record hands-free and choose how long of a delay you want after you activate your camera.
- Dual: Record a pair of videos using your rear and front cameras simultaneously.
- Align: Line up objects and frames between clips.
While the Instagram Reels editor boasts handy tools and features, it falls short of a full-fledged, high-quality editing software like Vizard. With Vizard, you can add even more robust effects, translate or add subtitles to your audio and more. If you want to elevate your Instagram Reels and truly stand out from the crowd, leveraging Vizard to power your editing process is an excellent choice.
5. Customize Your Settings
Once you have finished editing your video, whether via the in-app Reels editor or through a platform like Vizard, you are almost ready to post it. You just need to add some custom settings first.
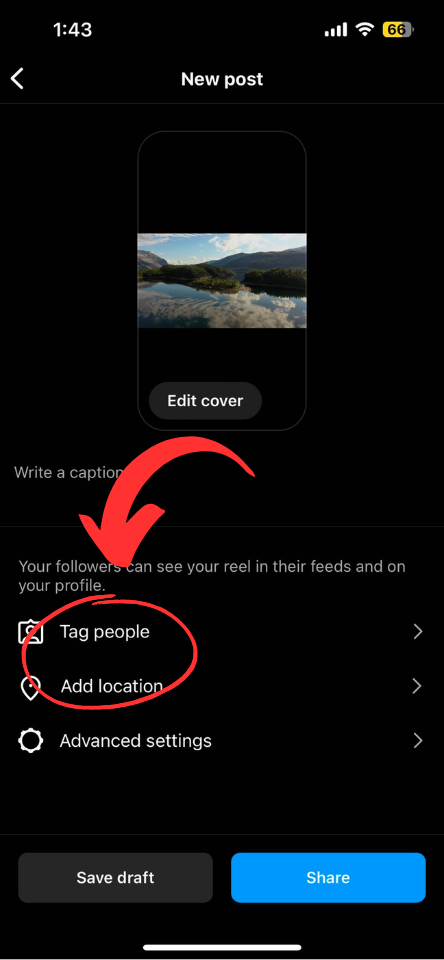
To do so, tap “Next” in the lower right corner of the screen. From here, you can choose a frame from the content to set as your Reel “cover,” the first image users will see when viewing your content. In addition to setting a Reel cover, you can do the following from within the custom settings menu:
- Add a caption
- Tag people
- Add a location
- Enable Facebook recommendations
- Name your audio clip (if using your own audio)
- Disable or enable captions
- Post your Reel to your Instagram feed
We suggest enabling Facebook recommendations, as doing so will allow your Reel to simultaneously appear on the feeds of Facebook users that the algorithm believes will enjoy your videos. You should also post your Reel to your Instagram feed to further optimize your reach.
6. Post or Schedule Your Reel
Lastly, upload your Reel by tapping the “Share” button. If you want to wait until peak scrolling time to publish your content, schedule it for later using Instagram’s built-in tools to maximize the impact of your new content. A collection of video content can come in handy, allowing you to schedule the upload of several posts weeks in advance for optimal brand publishing consistency. This strategy can significantly increase user engagement and help you stand out as a sophisticated and reliable content producer.
Vizard is a versatile tool for Instagram campaigners who prefer working outside of the app. Our platform streamlines the posting process, whether you want to publish content now or schedule it for future dates. This way, you can focus on your creative pursuits, knowing that Vizard will easily handle the posting duties.
After uploading, you will have successfully published your first Reel!
Ready to Start Making Instagram Reels with Vizard?
Understanding how to make a video reel on Instagram can jump-start your marketing efforts, but it’s just the beginning. To truly elevate your Instagram Reels, you need to expand beyond the app’s native tools. After all, creating Instagram Reels that get you noticed by the right audience is a process that requires finesse, creativity, and — most importantly — the right set of editing and video publishing tools.
If you are searching for the best way to make reels, Vizard’s artificial intelligence-fueled Instagram Reels maker is your solution. It can help you create a reel on Instagram faster than ever. With our platform’s set of robust tools at your disposal, you can edit your video content, add special effects, transcribe audio, and add subtitles in your choice of more than a dozen differences. If we’ve piqued your interest, connect with Vizard and learn how to make IG Reels with the power of AI video editing software today.


